Uconnect 5 10.1″ UBN Troubleshooting Guide
Uconnect 5 10.1″ UBN Troubleshooting Guide
For: 2014–2022 Jeep Grand Cherokee & 2018–2023 Jeep Gladiator/Wrangler
🗺️ Connections Overview
1. Port Overview (Color-Coded)
| Connector Color | Function | Action/Notes |
|---|---|---|
| Blue | GPS Antenna | Connect using Fakra conversion adapter from the C-INTC5T harness. |
| White | AM/FM Antenna | Connect directly to the white Fakra port on the radio. |
| Tan | 2nd Digital (Cargo) Camera Input | Routed internally via C-INTC5T harness – no direct connection required. |
| Red | 1st Digital (Backup) Camera Input | Routed internally via C-INTC5T harness – no direct connection required. |
| Brown | USB Hub | Connect via USB media hub conversion harness to dashboard USB ports. |
| Light Blue | Vehicle Network (Radio Data Bus) | Route through C-INTC5T harness – ensure solid click into connector. |
| Light Green | CAN Audio Network (Speaker Control) | Route through C-INTC5T harness – controls audio output to speakers/amp. |
🔧 1. Overview
This guide supports the installation and troubleshooting of the Uconnect 5 10.1″ UBN upgrade system, most commonly found in 2021+ models. It includes important notes on compatibility and behavior following upgrade installation.
📦 2. Parts Needed
Uconnect 5 10.1" UBN Display & Radio Unit
Part List:
10.1" Screen or 8.4" Screen
UBN Radio Module
Radio Module Bracket*
Rear Bezel Bracket*
Rear Screen Bracket*
Ten Screws (4 long for bracket, 6 short for screen)*
HVAC Module (2014–2015 Only)
USB Hub
LVDS Cable
USB Conversion Cable
Radio Conversion Harness
Genie Max
Screen Power Harness
Wifi/Bluetooth Antenna
XM/GPS Antenna Adapter
*Not needed for all kits; depends on the screen size selected and the original factory radio.
🛠️ 3. Installation Instructions
Disconnect battery before beginning any disassembly.
Remove OEM radio and display components.
Install the new 10.1″ Uconnect 5 radio unit and display.
Route and connect all factory wiring and supplied harnesses, ensuring all connections are secure before powering on the system.
Mount the display and reassemble the dash using the new bezel.
Reconnect the battery and start the vehicle.
⚠️ 4. Initial Boot Behavior
First boot may take up to 2 minutes.
Screen may display a black background before initializing.
Android Auto/Apple CarPlay may take an additional minute to become available.
Vehicle Acclimation Required After UBN Install:
After completing the Uconnect 5 (UBN) installation, the vehicle may require a short acclimation period before all features become fully functional. This process can sometimes take up to 24–48 hours. During this time, some functions—such as navigation accuracy, climate control presets, or backup camera—may temporarily behave inconsistently. This is normal and typically resolves on its own once the vehicle systems fully sync with the new UBN hardware and software.
🧰 5. Common Issues & Troubleshooting
Issue: No Audio or Inconsistent Volume
Fix: Ensure all audio connectors are properly seated.
Fix: Perform a hard reset: Hold volume and tuner knobs for 10–15 seconds.
Issue: HVAC Controls Unresponsive
Fix: Confirm HVAC module compatibility.
Fix: Check the Genie Max interface DIP switch settings.
Issue: No Android Auto / Apple CarPlay
Ensure Bluetooth and Wi-Fi are enabled on your phone.
Bluetooth connection loss or weak Bluetooth signal.
Hold your phone as close to the screen as possible to see if signal strength increases. A signal extender is available if needed.
Restart both your phone and the vehicle.
On your Uconnect 5 screen, go to “Phone” → pair with your phone via Bluetooth → follow prompts for wireless CarPlay or Android Auto setup.
If wireless doesn't connect:
Try forgetting the vehicle from your phone’s Bluetooth list and re-pair.
Confirm Location Services are enabled (especially for Android Auto).
For wired connections: use a certified Lightning or USB-C cable (avoid generic cables).
📄 How to Set Up Wireless CarPlay / Android Auto (Infotainment)
📄 Apple CarPlay Troubleshooting (Apple)
📄 Android Auto Troubleshooting (Google)
Issue: Unit Stuck on “Loading” or Black Screen
Fix: Cycle power, verify connections.
Fix: Try holding volume + tuner knobs for 15 seconds.
Performing a Full Power Reset via Fuse Removal
Simply disconnecting the main battery may not fully reset the modules due to residual power from the auxiliary battery (common in vehicles with Engine Stop/Start systems).
Steps for JGC WL and Wrangler/Gladiator:
Verify that all hardware is fully installed and securely connected.
Disconnect the negative terminal of the main battery to stop primary power flow.
Locate the fuses (Wrangler Gladiator) responsible for the head unit (F97 20A Yellow) and HVAC center stack (F105 10A Red) located in the diagram below.
Locate the fuses (Jeep Grand Cherokee) responsible for the Radio (53 MICRO2 20A Yellow).
Remove both fuses and wait approximately 10–15 minutes to allow all residual power (including from the auxiliary battery) to fully drain.
Reconnect the negative terminal of the main battery.
Reinstall both fuses at the same time to simultaneously restore power to the systems.
This process forces a complete reboot of the head unit and HVAC modules, allowing the vehicle to reinitialized communication with the newly installed hardware.
- Jeep Grand Cherokee (WL)
-
Radio Power Fuse: A 20 Amp yellow micro fuse located near the battery under the front passenger seat. It is enclosed in a black rubber capsule with a thick orange wire. This fuse is not in the main fuse box and can be difficult to find.
-
ICS/HVAC Fuse: Fuse F49 – 10 Amp red mini fuse labeled Integrated Center Stack / Climate Control. Located in the interior fuse panel, this fuse powers the integrated center stack (ICS) module and HVAC controls, not the screen directly.
The Jeep Grand Cherokee WK uses two key fuses related to the radio system and associated functions:
🚫 6. Grand Cherokee 10.1" UBN – No Backup Camera
When upgrading a 2019+ New Body Grand Cherokee to the UBN 10.1", some users have reported that the backup camera does not display when shifting to reverse (no screen change).
✅ Solution:
Performing a Full Power Reset via Fuse Removal (refer to the steps above)
- Change the Genie Max DIP switch orientation to MODE 17. This is a configuration originally designed for the Wrangler/Gladiator 10.1" UBN upgrade without HVAC changes.
🔁 DIP Switch Settings – Mode 17:
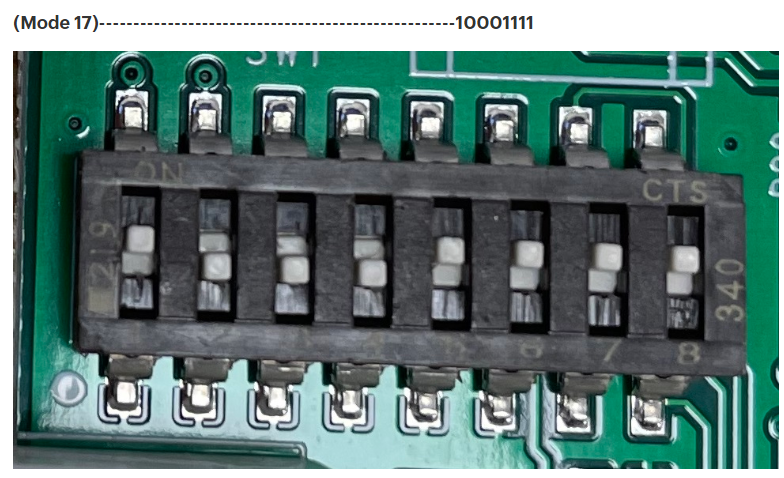
This setting has resolved the issue in multiple Grand Cherokee vehicles and enabled the reverse camera view to display properly.
⚠️ Note on Off-Road Pages:
Using MODE 17 will populate Off-Road Pages, but the vehicle shown in the menu will resemble a Wrangler, not a Grand Cherokee. This is a visual anomaly only and does not affect functionality.
If a customer raises this concern:
Inform them the feature is non-functional for their model regardless.
The vehicle image cannot currently be changed.
This may be addressed in a future software update.
📝 7. Additional Notes
Trailhawk trims may eventually require a modified configuration to correct visual/functional discrepancies.
Always confirm firmware and module compatibility before installation.
If unsure, contact support for up-to-date Genie Max DIP switch maps.
Related Articles
Uconnect 4 UAQ/UAS – Connection & Troubleshooting Guide
Uconnect 4 UAQ/UAS – Connection & Troubleshooting Guide ? 1. Parts List (*Included only when bezel is ordered) UAQ Radio USB Hub *USB Hub Harness *8.4" OEM Bezel *HVAC Module *Resistor *Resistor Harness *Bezel Harness ? 2. Rear Connector Overview ...Uconnect 5 UBD Retrofit – Connection & Troubleshooting Guide
? Uconnect 5 UBD Retrofit – Connection & Troubleshooting Guide ?️ 1. Port Overview (Color-Coded) Connector Color Function Action/Notes Blue GPS Antenna Connect to GPS Fakra via conversion harness (C-INTC5T). White AM/FM Antenna Plug directly onto ...Ram Passive Keyless Entry Upgrade – Troubleshooting Guide
? Passive Keyless Entry Upgrade – Troubleshooting Guide ⚠️ 1. Door Handle Touch Sensors Not Responding Check for Secure Connections: Confirm that all connectors are fully seated and locked into place. Inspect Door Handle Installation: Ensure that ...Uconnect 5 UBQ 12" & UBL 8.4" Upgrade – Connection & Troubleshooting Guide
Uconnect 5 UBQ 12" & UBL 8.4" Upgrade – Connection & Troubleshooting Guide ?️ 1. Port Overview (Color-Coded) Connector Color Function Action/Notes Blue GPS Antenna Connect using Fakra conversion adapter from the C-INTC5T harness. White AM/FM Antenna ...UAX Troubleshooting guide
? UAX Radio Troubleshooting Guide For Infotainment.com Upgrade Kit Users This guide will help you quickly diagnose and resolve issues related to your upgraded UAX infotainment system. It includes hardware port references, how to access diagnostic ...